- Make sure that the vehicle is on a flat, stable surface.
NOTE:
The vehicle cannot be on a lift during this procedure.
- Make sure that all tires are inflated to their recommended pressures (refer to Tire Pressures
).
- Make sure that the panoramic roof is fully closed, if equipped.
- Make sure that the power liftgate is operational, if equipped.
- Protect all panels that are adjacent to the liftgate:
- C-Pillar body panel
- Fixed glass panel (with panoramic roof) /roof panel (without panoramic roof)
- Quarter panels
- Rear fascia
- Remove the upper liftgate finisher and the LH and RH side liftgate finishers Finisher - Liftgate - Rear Window - Side - LH (Remove And Replace)
.
- Open all 4 windows. This prevents internal pressure from pushing out on the liftgate glass when it is installed.
- Disconnect the harnesses (x2) that attach to the glass on the LH side of the liftgate. Tape the harnesses to the liftgate so that they are out of the way when the glass is removed in a later step.
CAUTION:
Take care not to damage component(s).
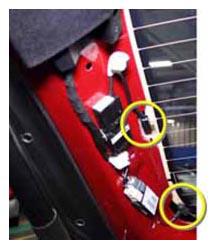 Courtesy of TESLA, INC. Courtesy of TESLA, INC.
|
- Disconnect the harnesses (x2) that attach to the glass on the RH side of the liftgate. Tape the harnesses to the liftgate so that they are out of the way when the glass is removed in a later step.
CAUTION:
Take care not to damage component(s).
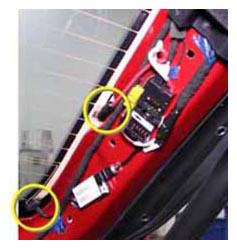 Courtesy of TESLA, INC. Courtesy of TESLA, INC.
|
- Disconnect the harness that attaches to the center high mounted stop light (CHMSL). Tape the wires out of the way so that they are not damaged when the glass is removed in a later step.
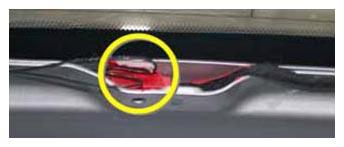 Courtesy of TESLA, INC. Courtesy of TESLA, INC.
|
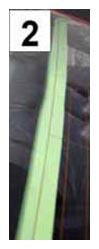
- With the liftgate open, tape off the black rear fit on the liftgate glass.
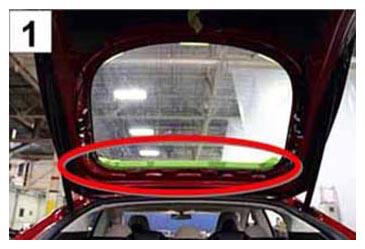 Courtesy of TESLA, INC. Courtesy of TESLA, INC.
|
 Courtesy of TESLA, INC. Courtesy of TESLA, INC.
|
| 1 |
The rear fit viewed from the underside of the raised liftgate. |
| 2 |
The rear fit viewed from the outside of the liftgate. |
- Cover the floor and side carpet panels inside the trunk with plastic. This prevents water damage in a later step.
WARNING:
Read all documentation concerning the Equalizer Express360 tool before continuing this procedure.
- Insert the cutting blade into the Equalizer Express360 tool.
CAUTION:
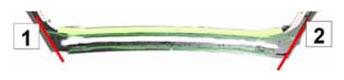
Only use the Equalizer Express360 to cut the 2 lines of urethane at the back of the liftgate glass (shown in green in the figure below). Do not use it to cut the urethane at the sides or bottom of the glass.
 Courtesy of TESLA, INC. Courtesy of TESLA, INC.
|
| 1 |
Do not cut to left of this red line. |
| 2 |
Do not cut to right of this red line. |
CAUTION:
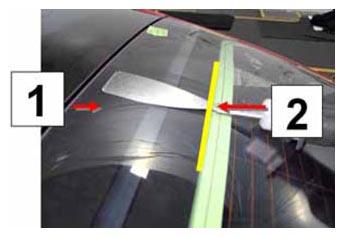
The front and rear frits protect the 2 lines of urethane from UV light. If the frits are damaged in any way, the liftgate glass must be replaced. While cutting, never move the base (non-cutting) part of the tool past the top fit.
 Courtesy of TESLA, INC. Courtesy of TESLA, INC.
|
| 1 |
Bottom fit (when liftgate is open). |
| 2 |
Top fit (do not push the base of the tool beyond this point). |
CAUTION:
Before and during cutting, use water or alcohol to lubricate the urethane. If any other materials are used for lubrication, fully clean the affected area before applying more urethane.
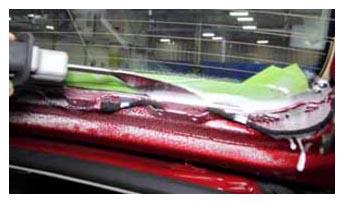
- Position the tool at a 45 degree angle along the rightmost edge of the top line of urethane. Start cutting the urethane, moving the cutting tool from right to left while an assistant continues to spray the soap and water solution to lubricate the urethane.
WARNING:
To avoid personal injury, eye protection must be worn when performing this operation.
CAUTION:
Do not cut past the left red lines shown in the first figure in the previous step.
CAUTION:
Do not damage the CHMSL while cutting the bottom line of urethane.
 Courtesy of TESLA, INC. Courtesy of TESLA, INC.
|
- Repeat the previous step for the bottom line of urethane.
WARNING:
Before proceeding, read all documentation for the Equalizer Python rotating cut-out wire.
- Use the Equalizer Python tool to cut the urethane around the sides and bottom of the liftgate.
- Secure suction cups onto the outside of the liftgate glass.
CAUTION:
Do not rely solely on the suction cups when moving the liftgate glass. Ensure that the glass is supported from the bottom while moving.
- Lift the glass off of the liftgate and set it gently onto a stand. Note the installed position of any height or alignment setting blocks.
CAUTION:
Do not damage the CHMSL or the antennas.
- Carefully inspect the 2 frits on the liftgate glass. If they are scratched or damaged in any way, replace the liftgate glass.
CAUTION:
The frits protect the urethane that secures the liftgate glass from UV light. Because the liftgate glass is a structural component, the frits must be carefully examined. If they are scratched or damaged even slightly, the liftgate glass must be replaced.