Transmission Fluid Temperature Sensor Removal and Installation
Transmission Fluid Temperature Sensor Removal and Installation
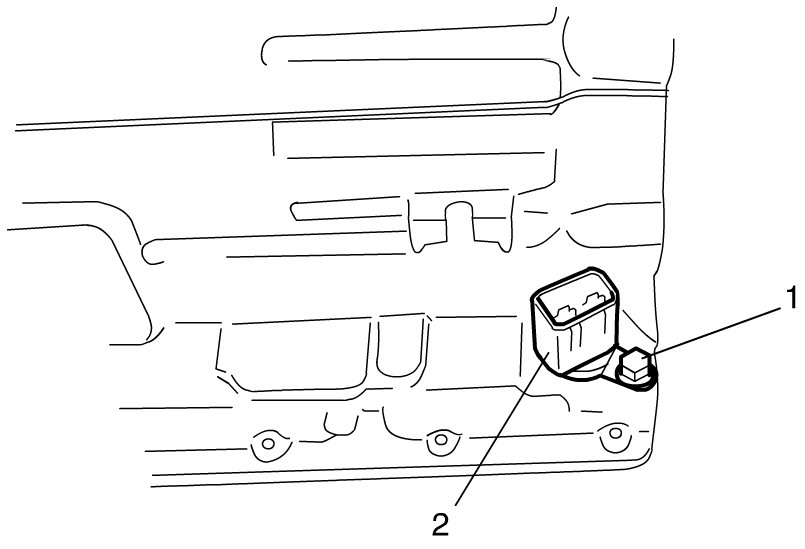
Removal
1) Disconnect connectors of solenoid valves referring to Solenoid Valves (Shift Solenoid-A, Shift Solenoid-B, TCC Pressure Control Solenoid and Pressure Control Solenoid) Removal and I Solenoid Valves (Shift Solenoid-A, Shift Solenoid-B, TCC Pressure Control Solenoid and Pressure Control Solenoid) Removal and Installation.
2) Remove transmission fluid temperature sensor from valve body.
3) After removing bolt (1) pull out solenoid connector (2) together with harness, connectors and sensor from transmission case.
NOTE:
The transmission fluid temperature sensor or the solenoid wire harness may be damaged if they are handled carelessly.
When drawing out the solenoid wire harness from the transmission case, draw it vertically from the case.
Installation
Transmission Fluid Temperature Sensor Inspection
Reverse removal procedure to install transmission fluid temperature sensor, noting the following points.
- For details of solenoid valves and their connectors installation, refer to Reassembly Automatic Transmission Unit Reassembly. Use new O-ring.
- For details of A/T oil pan installation, refer to Reassembly Automatic Transmission Unit Reassembly.
- Fill A/T fluid and check fluid level according to procedure described in Removal and Replacement A/T Fluid Change.
- Check for fluid leakage after warming up A/T.
- Tighten solenoid connector bolt to specified torque referring to Reassembly Automatic Transmission Unit Reassembly.