Removal and Installation
Front Seat Belt: Removal and Installation
Removal of Seat Belt Retractor - King Cab
CAUTION:
- Before servicing SRS, turn the ignition switch off, disconnect both battery terminals and wait at least three minutes.
1) Disconnect both the negative and positive battery terminals, then wait at least three minutes.
2) Remove the rear door finishers. Refer to [Door Finisher: Removal and Installation] Service and Repair.
3) Remove the retractor anchor bolt, retractor bolt upper, then remove the retractor and belt assembly.
- On RH side, disconnect the seat belt tension sensor.
4) Disconnect the seat belt pre-tensioner harness connector.
CAUTION:
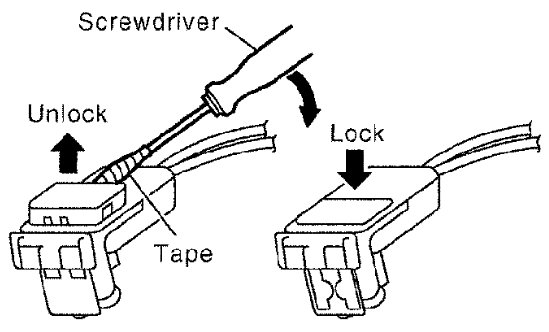
- For installing/removing seat belt pre-tensioner connector, insert a thin screwdriver wrapped in tape into the notch, lift the lock and remove the connector.
- Install the connector with the lock raised, and push the lock into the connector.
Installation of Seat Belt Retractor - King Cab
CAUTION:
Hold belt tension sensor harness away from being caught or twisted during installation.
Installation is in the reverse order of removal.
- Install the seat belt retractor upper bolt first.
- Ensure that seat belt height adjuster is locked in the lowest position during installation.
Removal of Seat Belt Retractor - Crew Cab
CAUTION:
- Before servicing SRS, turn the ignition switch off, disconnect both battery terminals and wait at least three minutes.
1) Disconnect both the negative and positive battery terminals, then wait at least three minutes.
2) Remove the center pillar upper/lower finishers. Refer to [Body Side Trim: Removal and Installation] Body Side Trim Removal and Installation.
3) Remove the seat belt retractor and belt bolts and assembly.
- On RH side, disconnect the seat belt tension sensor.
4) Disconnect the seat belt pre-tensioner harness connector.
CAUTION:
- For installing/removing seat belt pre-tensioner connector, insert a thin screwdriver wrapped in tape into the notch, lift the lock and remove the connector.
- Install the connector with the lock raised, and push the lock into the connector.
Installation of Seat Belt Retractor - Crew Cab
CAUTION:
Hold belt tension sensor harness away from being caught or twisted during installation.
Installation is in the reverse order of removal.
- Install the seat belt retractor and belt assembly upper bolt first.
- Ensure that seat belt height adjuster is locked in the lowest position during installation.
Removal of Seat Belt Buckle
1) Remove the front seat. Refer to [Front Seat: Removal and Installation] Front Seat Removal and Installation.
2) Remove screw and seat cushion inner finisher.

3) Remove the anchor bolt and buckle.
4) Disconnect the buckle switch connector from the seat connector.
Installation of Seat Belt Buckle
Installation is in the reverse order of removal.