Fluid Seal Ring Installation
 Courtesy of SUZUKI OF AMERICA CORP.
Fluid Seal Ring Installation
COMPONENT NAME REFERENCE
| Callout |
Component Name |
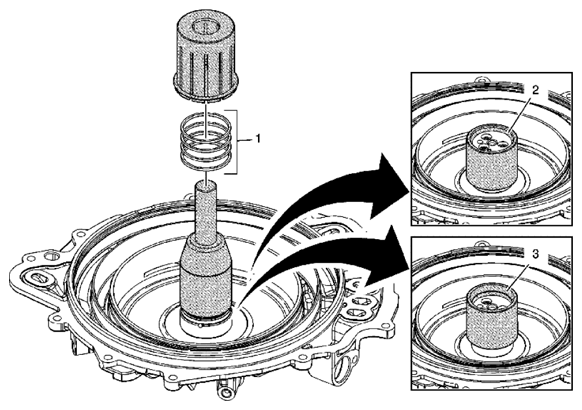
| 1 |
3-5 Reverse and 4-5-6 Clutch Fluid Seal Ring
Procedure
- Place J 46620-3 which is part of J-46620 seal installer over the case cover hub and adjust it so that only the bottom seal ring is exposed.
- Place a NEW fluid seal ring onto J 46620-3 which is part of J-46620 seal installer.
- Use J 46620-2 which is part of J-46620 seal installer to push the fluid seal ring down over J 46620- 3 which is part of J-46620 seal installer into the hub ring groove.
- Repeat the above steps to install all 4 seal rings, adjusting J 46620-3 which is part of J-46620 seal installer to the appropriate ring groove.
Special Tools
J-46620 Seal Installer
For equivalent regional tools, refer to SPECIAL TOOLS - AUTOMATIC TRANSMISSION - 6T70/6T75 . |
| 2 |
Small Chamfer Up
CAUTION:
Do not force J 46620-1 down over the seals as this will roll and damage the seals. The large chamfer is designed to fit over the over stretched seal. Use a hand to help shrink the seal if J 46620-1 is difficult to install over the seal rings.
Procedure
Install J 46620-1 which is part of J-46620 seal installer with the large chamfer end down over the fluid seal rings and leave J 46620-1 which is part of J-46620 seal installer on the seals for at least 60 seconds. |
| 3 |
Large Chamfer Up
Procedure
- Install J 46620-1 which is part of J-46620 seal installer with the small chamfer end facing down for at least 60 seconds. This will properly size the bottom seal ring.
- Leaving J 46620-1 which is part of J-46620 seal installer on the fluid seal rings for an extended period of time could cause a fluid leak on the initial clutch piston circuit until the seal rings warm up and expand to the proper dimension.
|