- Drive out left bearing cone (2) with 4th gear (3) by using puller (4) and hydraulic press.
CAUTION:
- Use puller and hydraulic press that will bear at least 5 ton (11,000 lb) safely.
- To avoid tooth damage, support 4th gear (3) at flat side of puller.
 Courtesy of SUZUKI OF AMERICA CORP.
- Apply puller (5) to 2nd gear (4) and drive out 3rd & 4th gear spacer (2) and 3rd gear (3) together with 2nd gear by using hydraulic press. Needle bearing would come out with 2nd gear.
CAUTION:
- If compression exceeds 5 ton (11,000 lb), release compression once, reset bearing puller and then continue press work again.
- To avoid gear tooth from being damaged, support it at flat side of bearing puller.
 Courtesy of SUZUKI OF AMERICA CORP.
- Take out 2nd synchronizer outer ring, center cone and inner ring.
- Using snap ring pliers (3), remove circlip (1).
NOTE:
Correct tool tips to be flat to facilitate removal of circlip.
 Courtesy of SUZUKI OF AMERICA CORP.
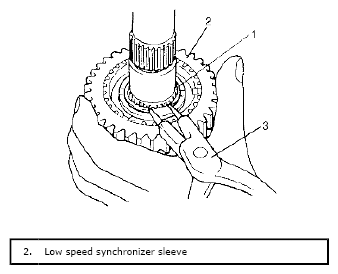
- Apply puller (3) to 1st gear (2) and drive out low speed synchronizer sleeve & hub assembly (1) with 1st gear by using hydraulic press.
CAUTION:
To avoid gear tooth from damage, support it at flat side of bearing puller.
 Courtesy of SUZUKI OF AMERICA CORP.
- Disassemble synchronizer sleeve & hub assembly.
- Take out 1st gear needle bearing from shaft.
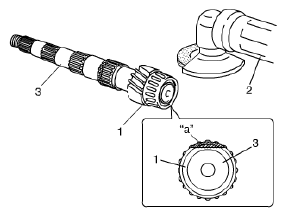
- In order to remove right bearing (1) from countershaft, grind with a grinder (2) one part "a" of right bearing (1) as illustrated till it becomes thin.
CAUTION:
Be careful not to grind too far not to damage the shaft (3).
 Courtesy of SUZUKI OF AMERICA CORP.
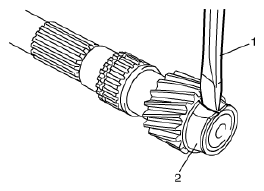
- Break with a chisel (1) the thin ground right bearing (2) and it can be removed.
 Courtesy of SUZUKI OF AMERICA CORP.