- Disconnect negative (-) cable at battery.
- Recover refrigerant from A/C system referring to OPERATION PROCEDURE FOR CHARGING A/C WITH REFRIGERANT .
NOTE:
The amount of removed compressor oil must be measured for replenishing compressor oil.
- Remove front bumper assembly referring to FRONT BUMPER COMPONENTS
.
- Remove front bumper upper member referring to FRONT BUMPER COMPONENTS
.
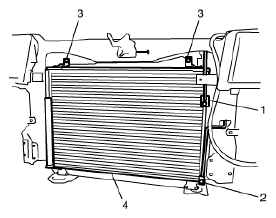
- Disconnect compressor discharge hose (1) and liquid pipe (2) from condenser assembly (4).
CAUTION:
As soon as above hose and pipe are disconnected, cap opened fittings so that moisture and dust do not enter condenser.
- Remove condenser assembly mounting bolts (3), and then remove condenser assembly.
NOTE:
Be careful not to damage fins of condenser and radiator.
 Courtesy of SUZUKI OF AMERICA CORP.