- Release fuel pressure in fuel feed line. Refer to Fuel Pressure Relief Procedure .
- Disconnect negative cable at battery.
- Remove engine hood after disconnecting windshield washer hose.
- Drain cooling system.
WARNING:
To help avoid danger of being burned, do not remove drain plug (1) and radiator cap while engine and radiator are still hot. Scalding fluid and steam can be blown out under pressure if plug and cap are taken off too soon.
 Courtesy of SUZUKI OF AMERICA CORP.
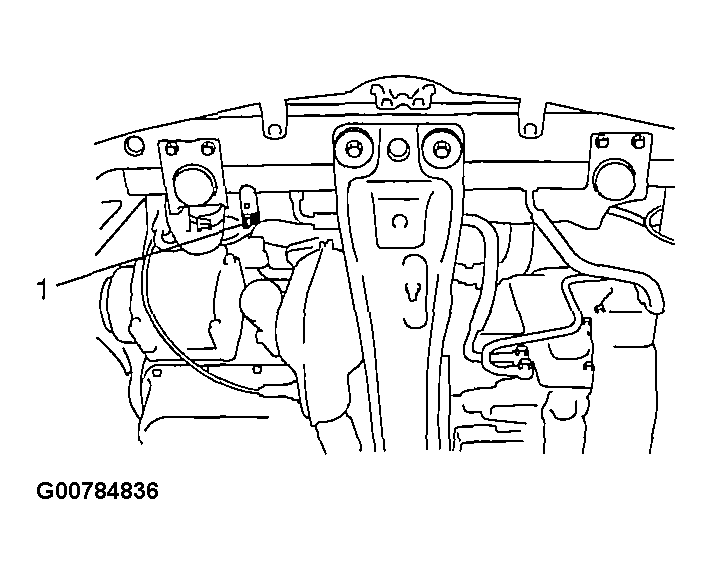
- Remove radiator. Refer to RADIATOR REMOVAL AND INSTALLATION
.
- Remove engine cover. Refer to Engine Cover Removal and Installation .
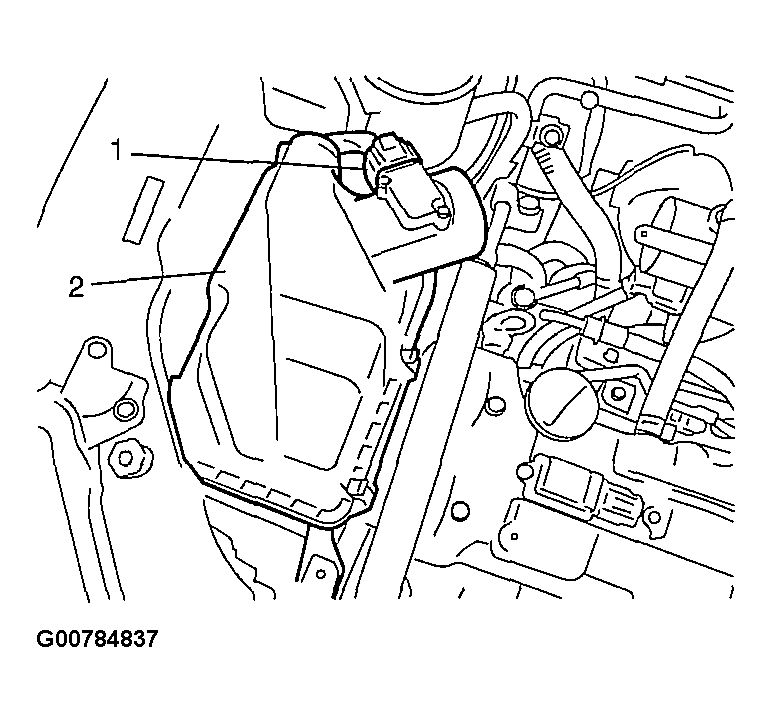
- Remove air cleaner outlet hose. Refer to Air Cleaner Outlet Hose Removal and Installation .
- Disconnect MAF sensor coupler (1).
- Remove air cleaner case assembly (2).
 Courtesy of SUZUKI OF AMERICA CORP.
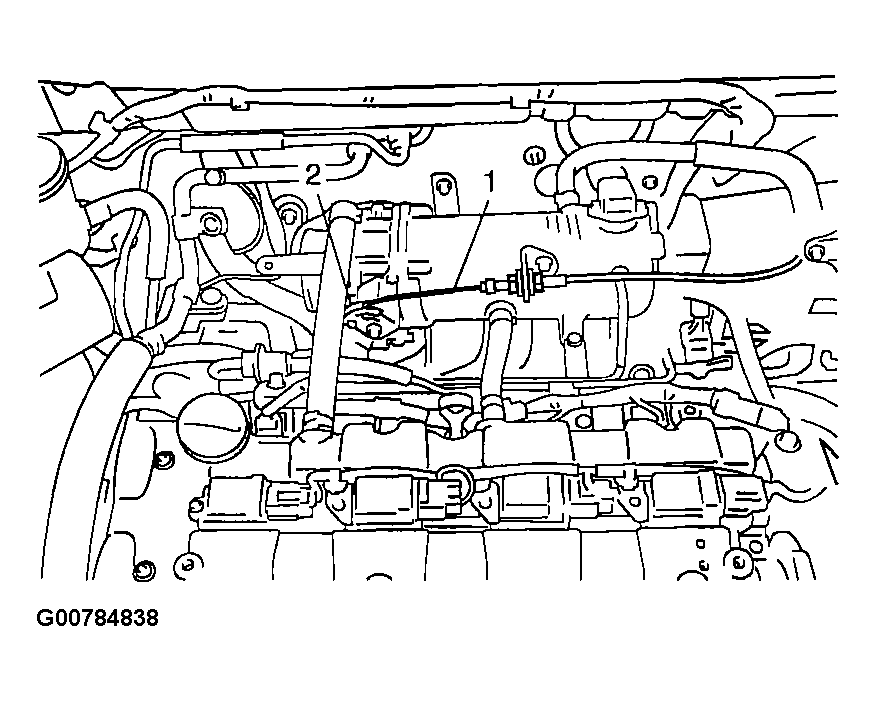
- Disconnect the following cables.
- Accelerator cable (1) from throttle valve lever (2).
- Shift and select cable from transaxle (for M/T model)
- Gear select cable from transaxle (for A/T model)
 Courtesy of SUZUKI OF AMERICA CORP.
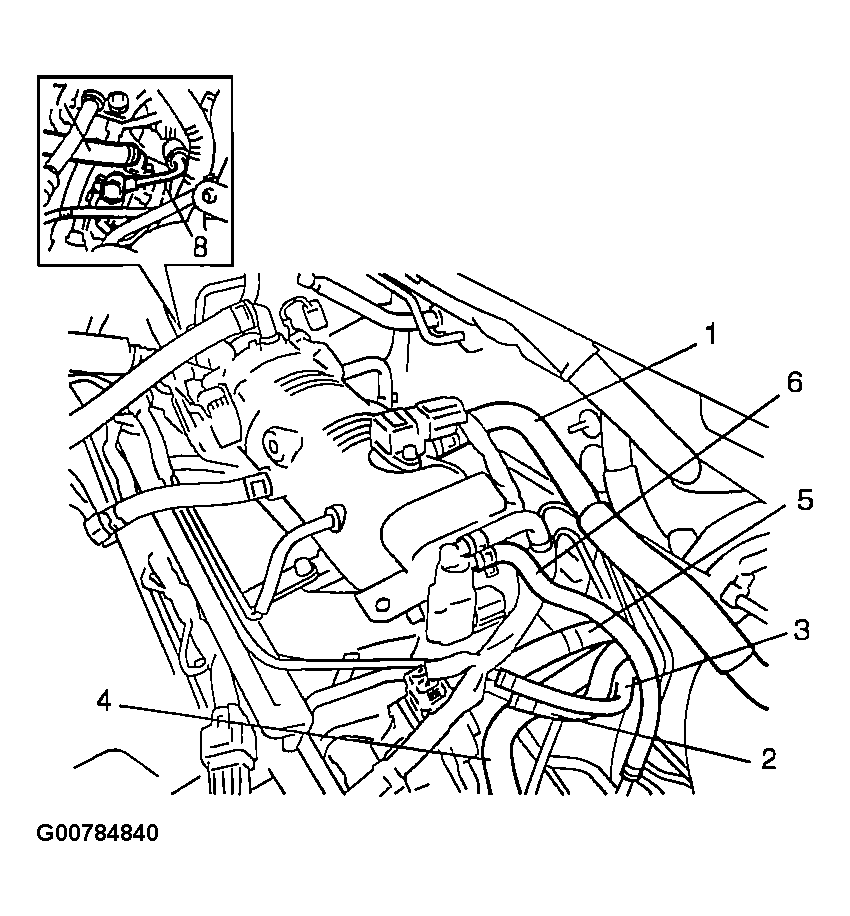
- Remove accelerator cable with its bracket from intake manifold.
- Disconnect the following hoses:
 Courtesy of SUZUKI OF AMERICA CORP.
 Courtesy of SUZUKI OF AMERICA CORP.
- Disconnect the following electric wires:
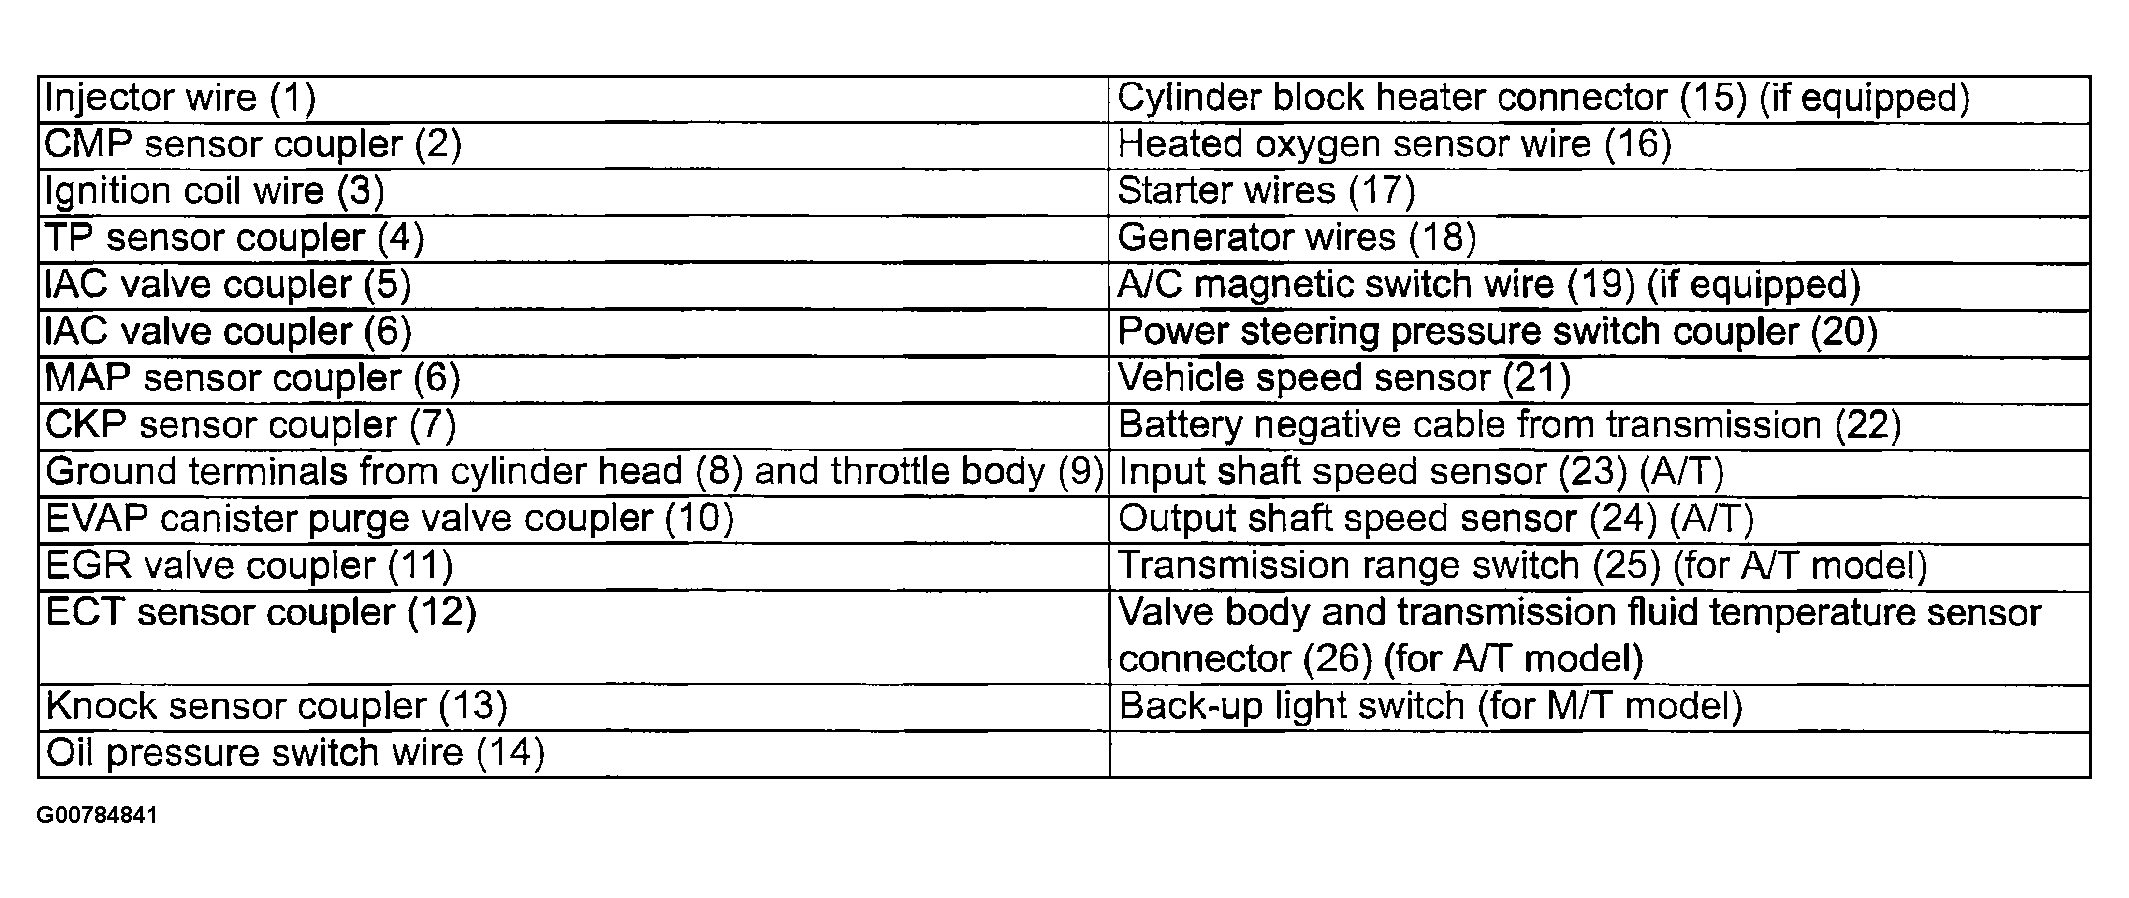 Courtesy of SUZUKI OF AMERICA CORP.
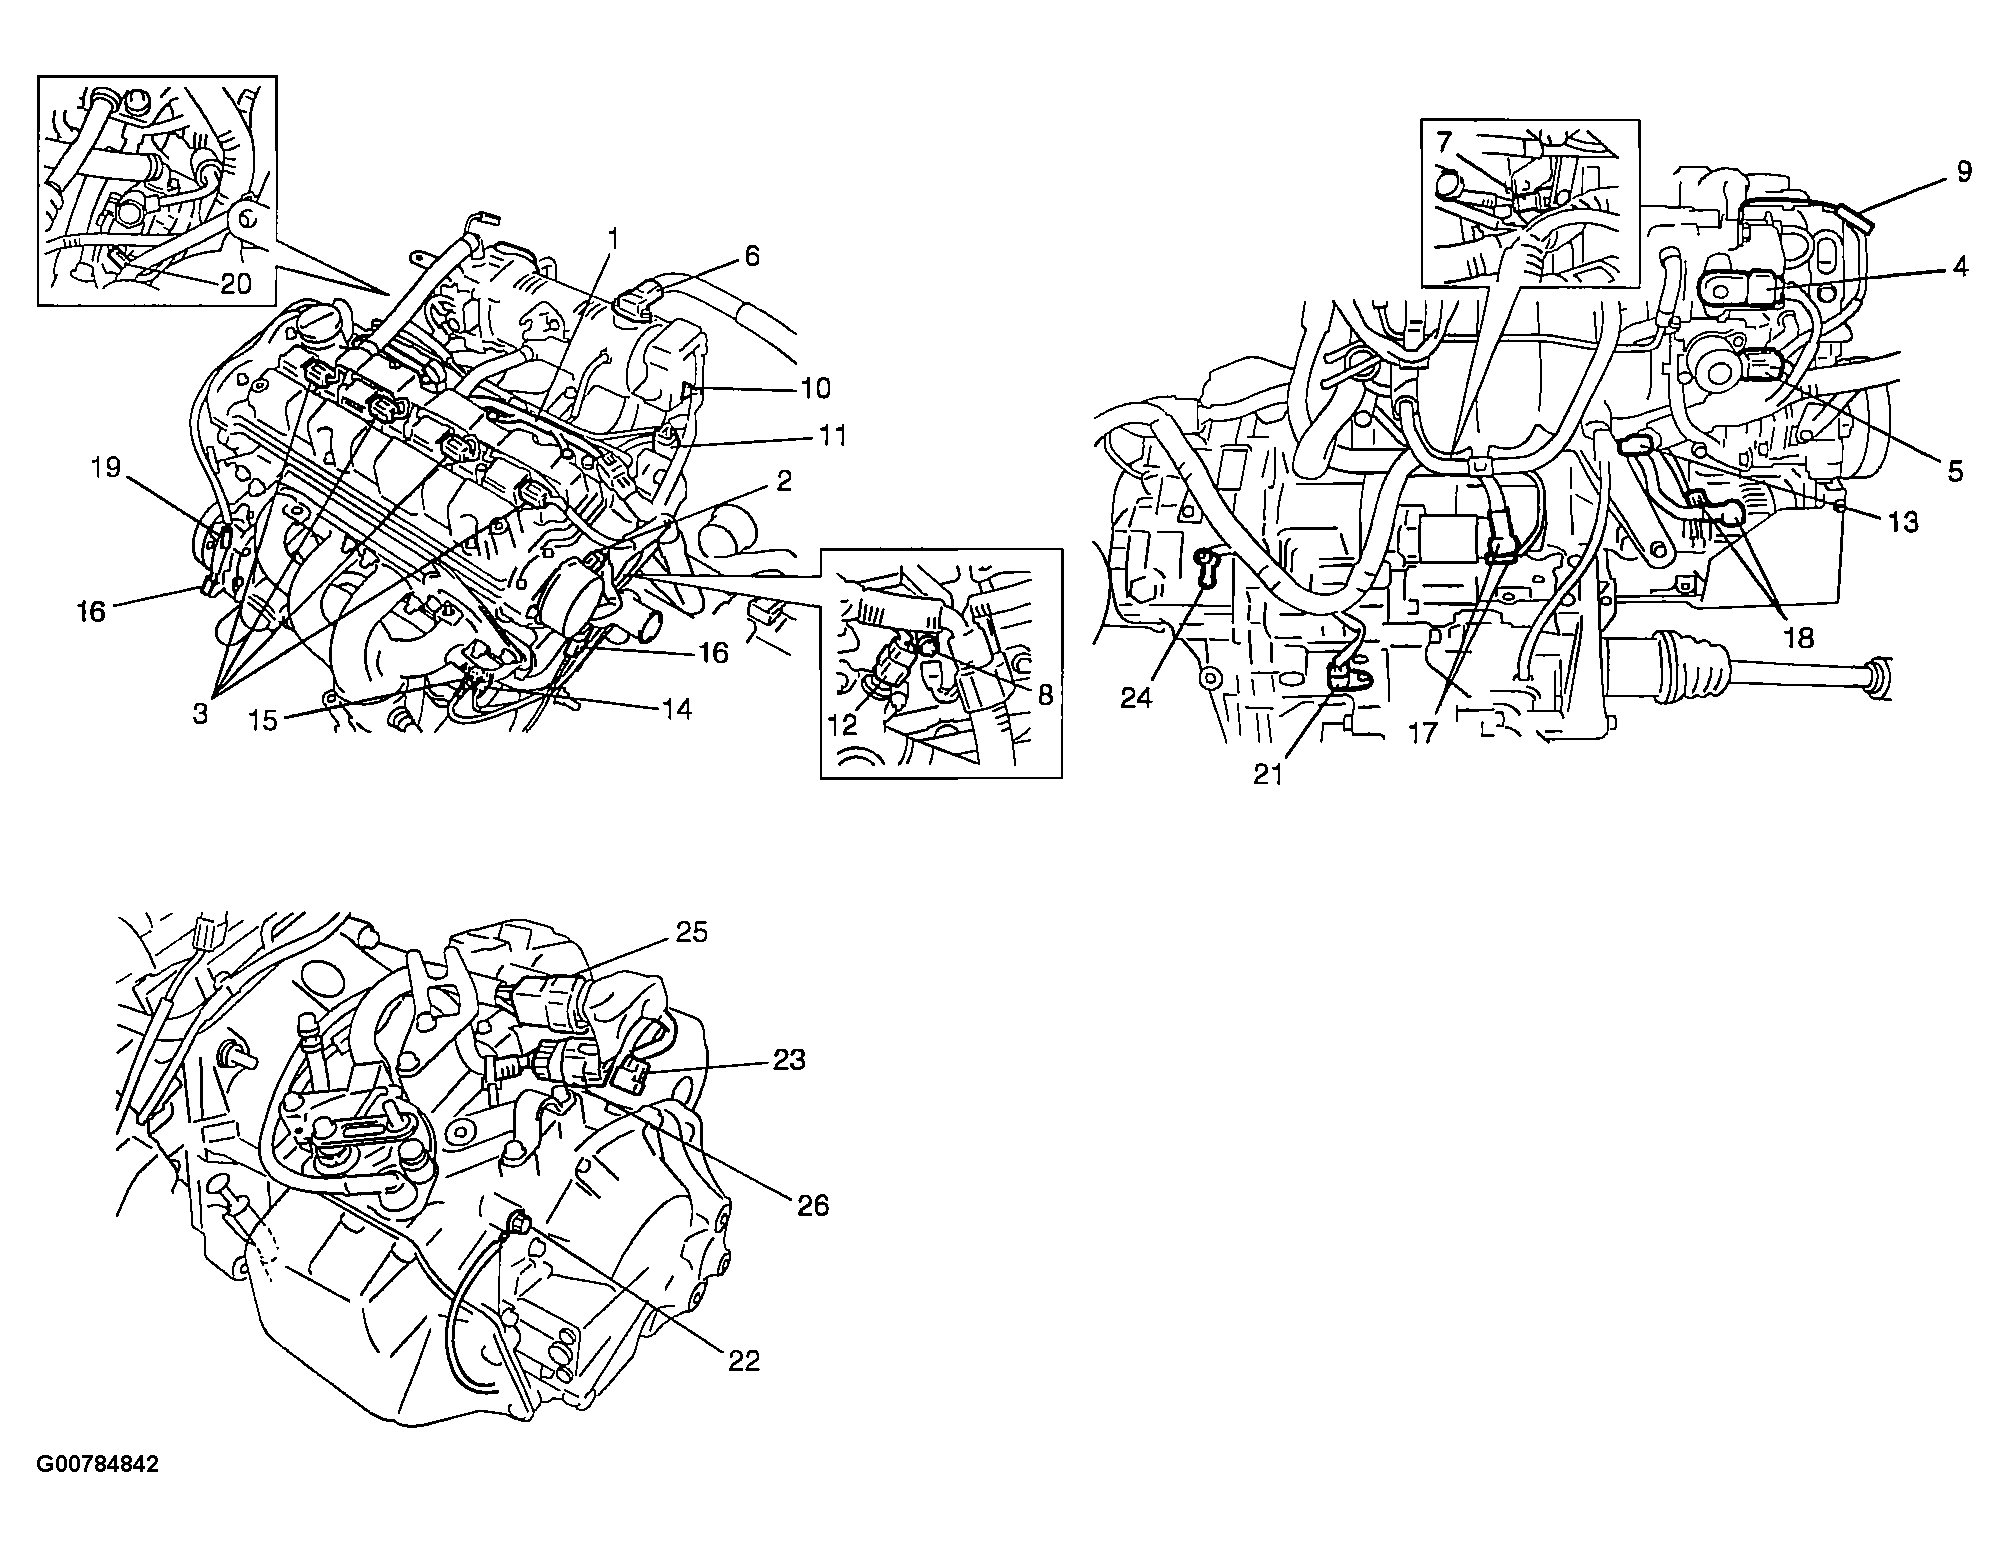 Courtesy of SUZUKI OF AMERICA CORP.
- Release the wire harness from clamps.
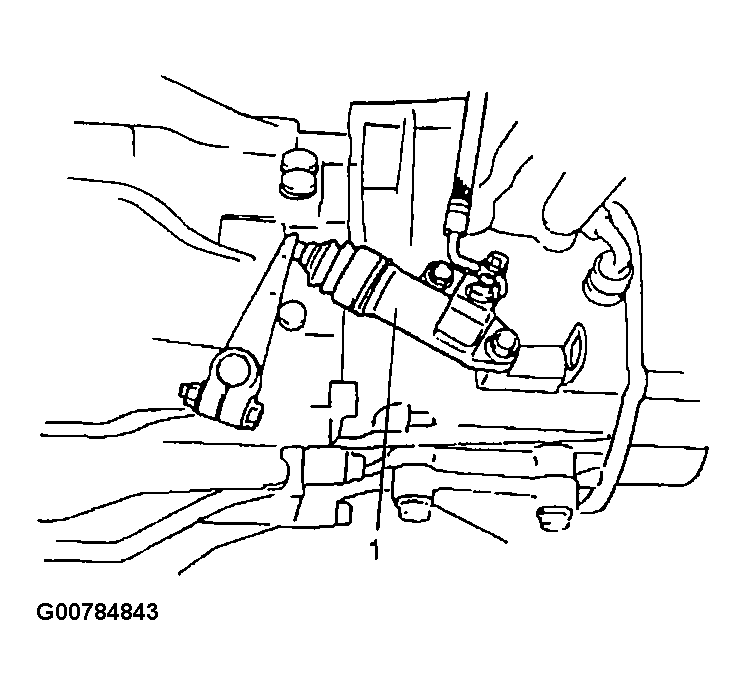
- Remove clutch operating cylinder (1) from transmission with hose still attached (for M/T model).
NOTE:
Suspend removed clutch operating cylinder at a place free from any possible damage during removal and installation of engine assembly.
 Courtesy of SUZUKI OF AMERICA CORP.
- Remove right and left engine under covers.
- Remove generator belt (Power steering pump drive belt) for equipped with A/C. Refer to GENERATOR DRIVE BELT
.
- Remove exhaust No. 1 pipe and No. 2 pipe.
- Drain engine oil, transaxle oil for M/T vehicle or A/T fluid for A/T vehicle and transfer oil for 4WD vehicle.
- Remove axle shafts. Refer to AXLE SHAFTS
.
- Separate propeller shaft front end from transfer output flange for 4WD vehicle.
- Remove A/C compressor from compressor bracket with hoses still attached, if equipped with A/C.
NOTE:
Suspend removed compressor at a place free from any possible damage during removal and installation of engine assembly.
- Remove intake manifold rear stiffener.
- Install lifting device.
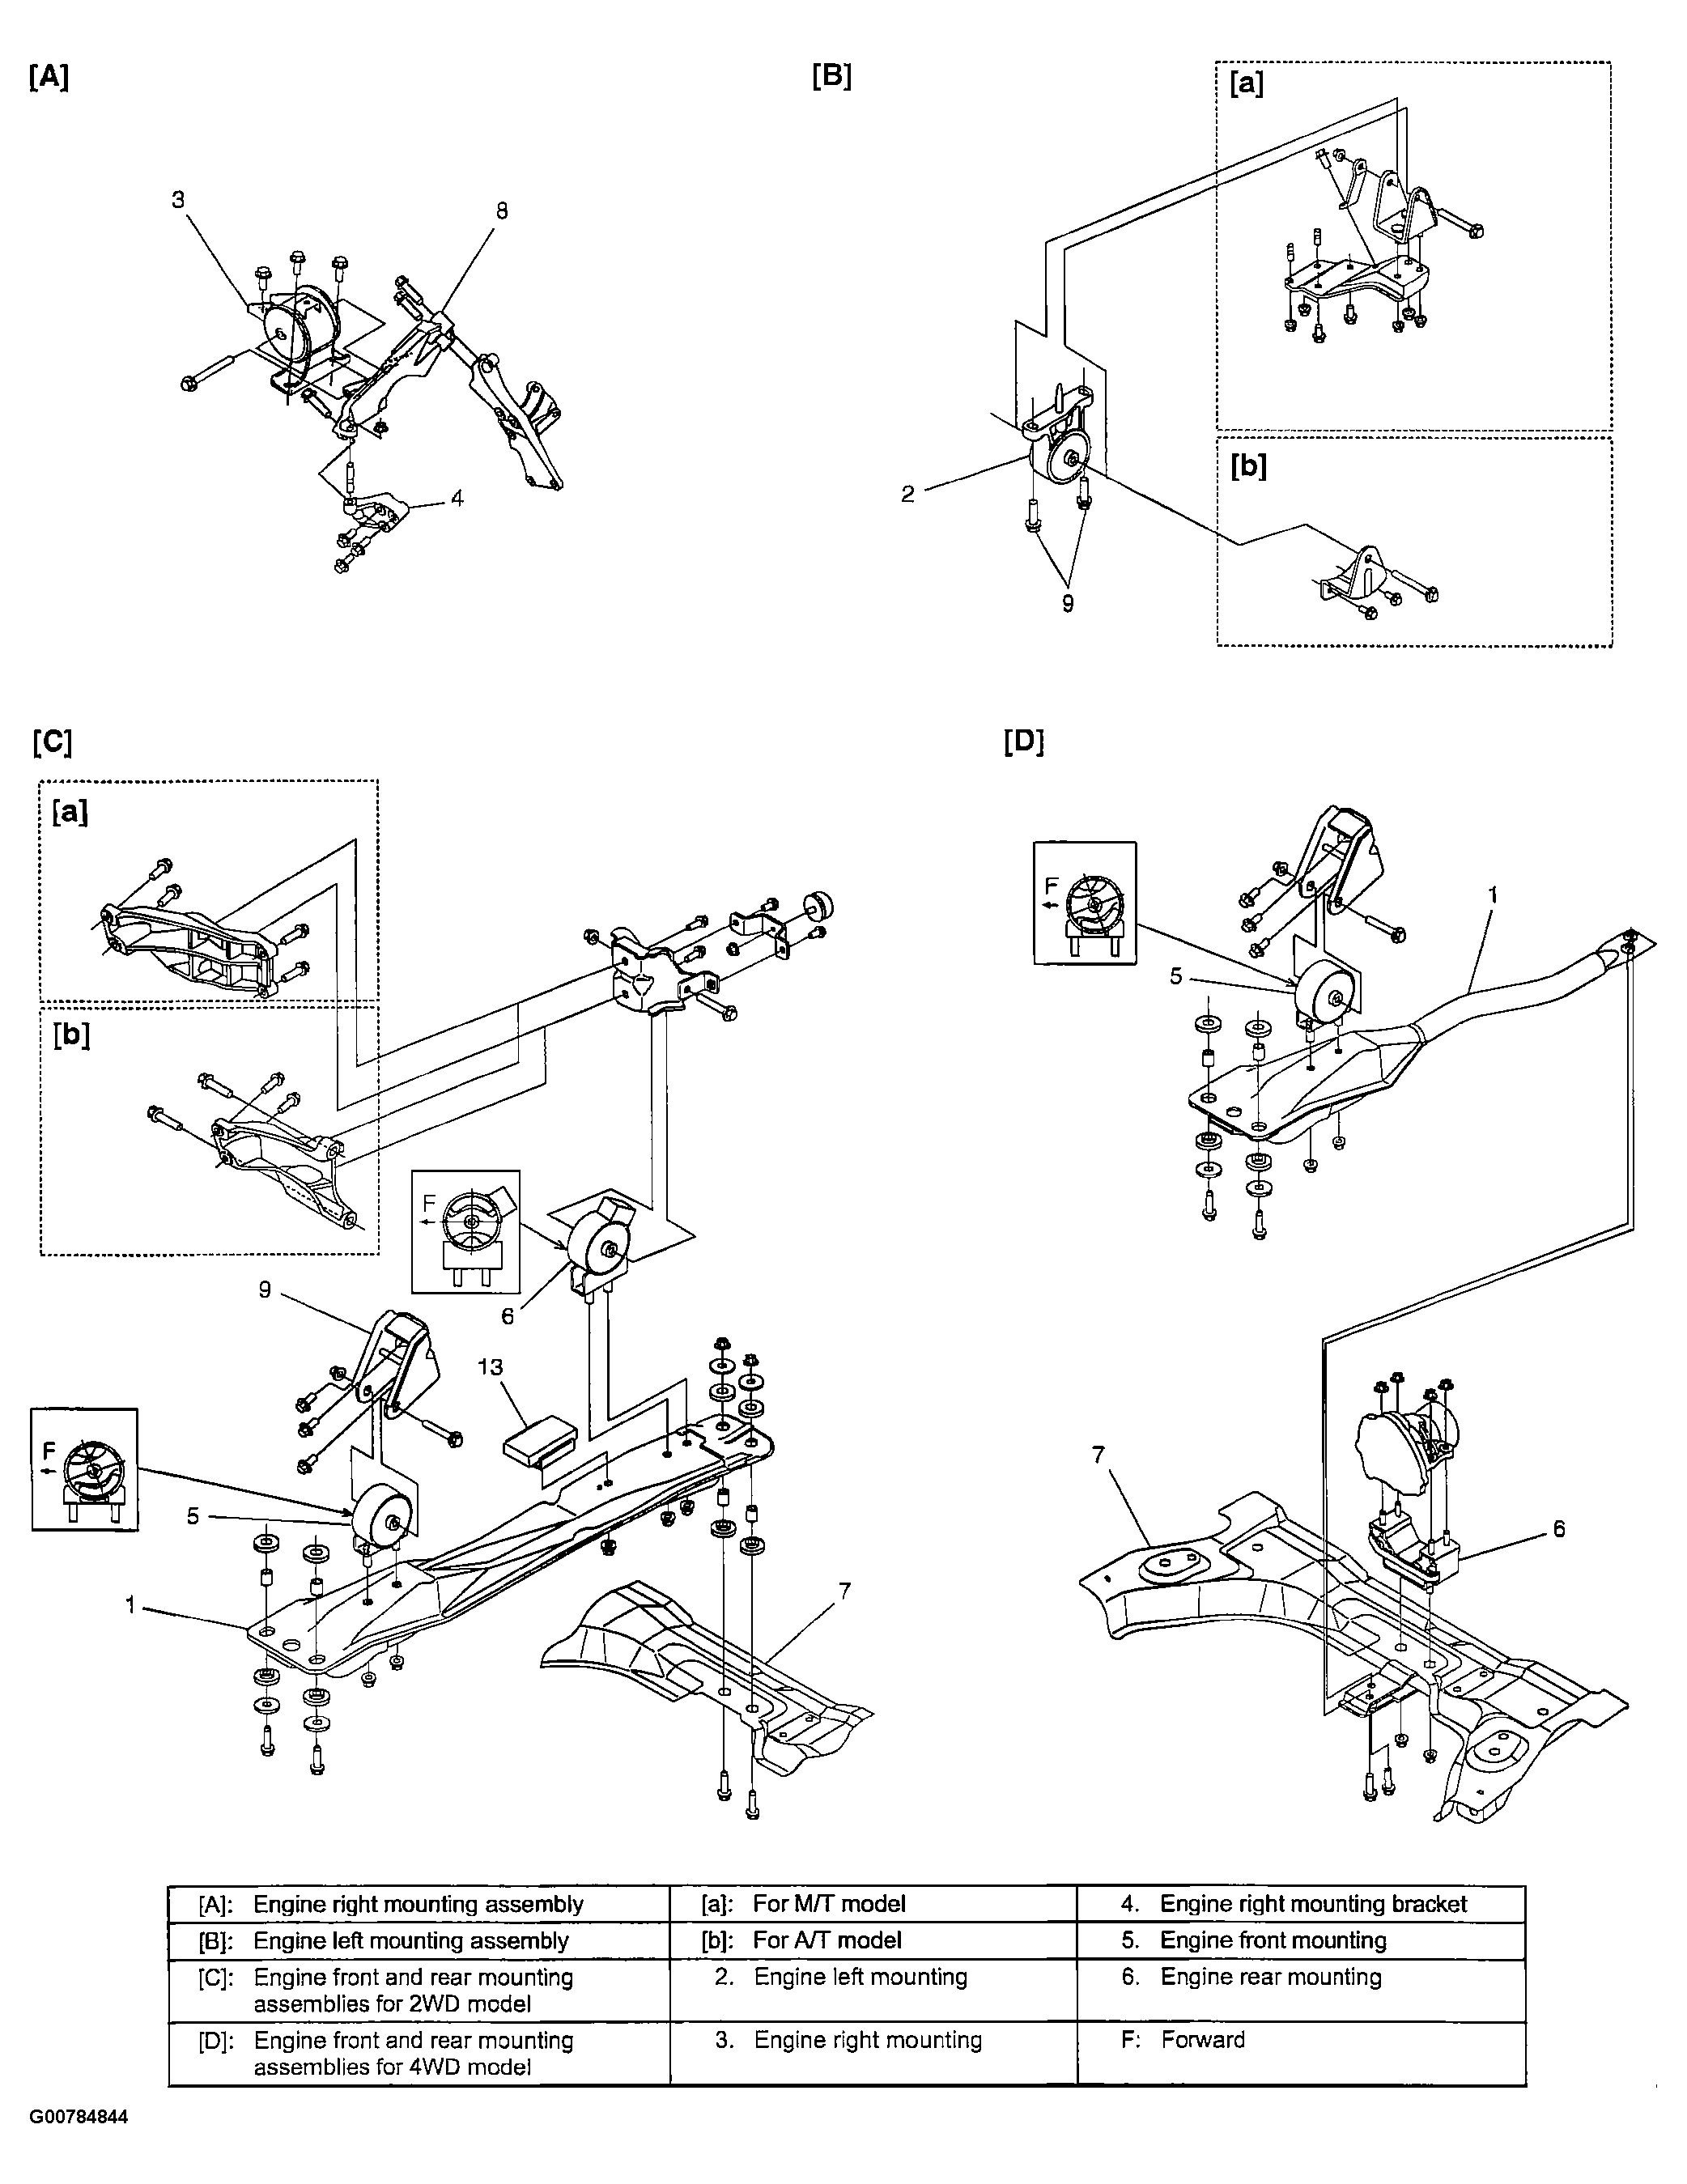
- Remove mounting member (1) from front member and suspension frame (7).
- Remove suspension frame (7) with stabilizer bar and suspension control arms. Refer to FRONT SUSPENSION FRAME REMOVAL AND INSTALLATION
for 4WD vehicle.
- Remove engine left mounting bolts (9).
- Remove engine right mounting No. 1 bracket (8).
 Courtesy of SUZUKI OF AMERICA CORP.
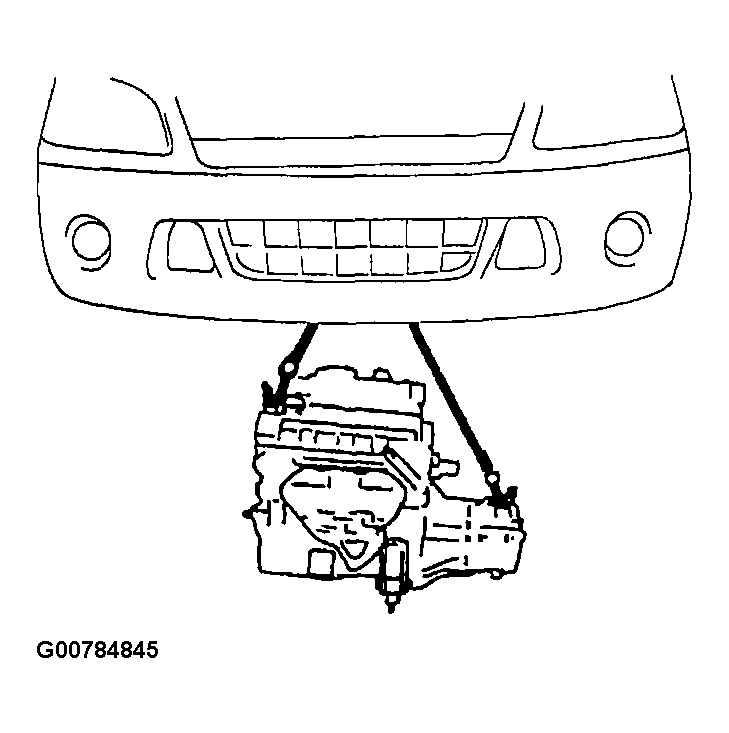
- Before removing engine with transaxle and transfer (for 4WD model) from vehicle body, recheck to make sure all hoses, electric wires and cables are disconnected from engine and transaxle.
- Lower engine with transaxle and transfer (for 4WD model) from vehicle body.
NOTE:
Before lowering engine, to avoid damage to A/C compressor, raise it through clearance made on engine crankshaft pulley side. At this time, use care so that no excessive force is applied to hoses.
 Courtesy of SUZUKI OF AMERICA CORP.
- Disconnect transfer from transaxle. Refer to TRANSFER DISMOUNTING AND REMOUNTING
.
- Disconnect transaxle from engine. Refer to MANUAL TRANSAXLE UNIT DISMOUNTING AND REMOUNTING
.
- Remove clutch cover and clutch disk. Refer to CLUTCH COVER, CLUTCH DISC AND FLYWHEEL REMOVAL
(M/T).