Diagnosis & Repair Procedure
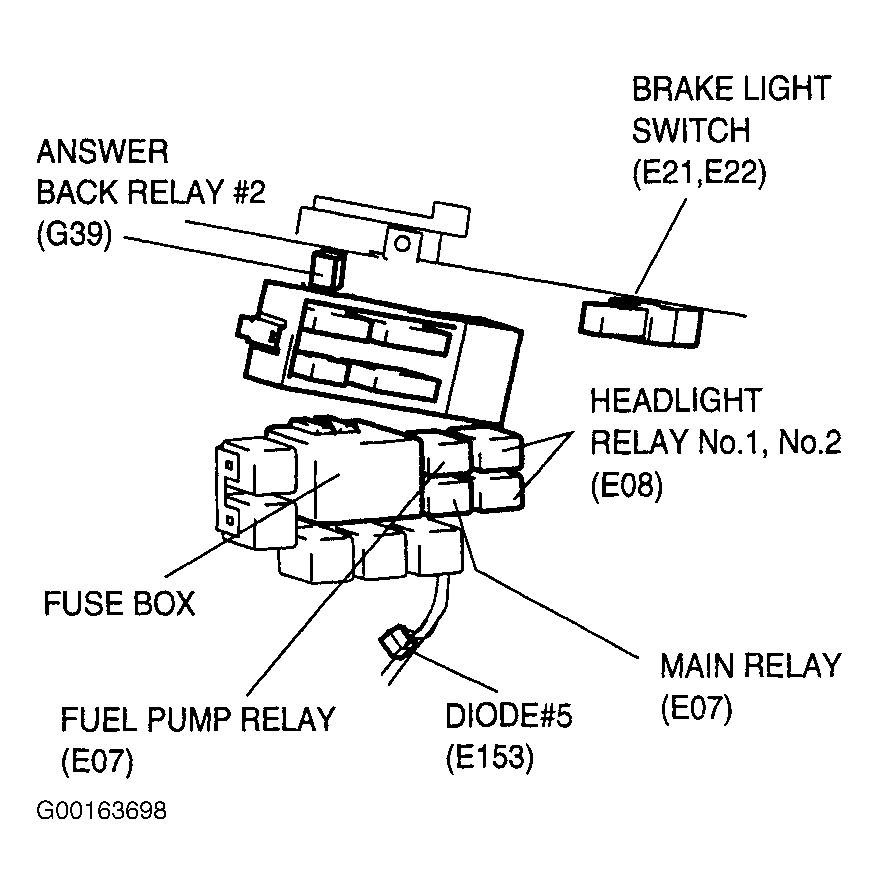
- Listen for main relay operating sound while ignition switch is cycled on, then off. Main relay is located in instrument panel fuse/relay block. See Fig 1. If operating sound is heard at relay, go to step 8. If no operating sound is heard at relay, check MAIN RELAY fuse (15-amp) in underhood fuse/relay block, located in right side of engine compartment. If MAIN RELAY fuse is okay, go to next step. If MAIN RELAY fuse is blown, check for short in suspect circuits. See WIRING DIAGRAMS
article. If problem is found, repair as necessary. After repair, retest system.
- Turn ignition off. Remove main relay from instrument panel fuse/relay panel. Check for poor terminal contact at main relay socket cavity. If poor terminal contact is found, repair as necessary. After repair, retest system. If terminal contact is okay, go to next step.
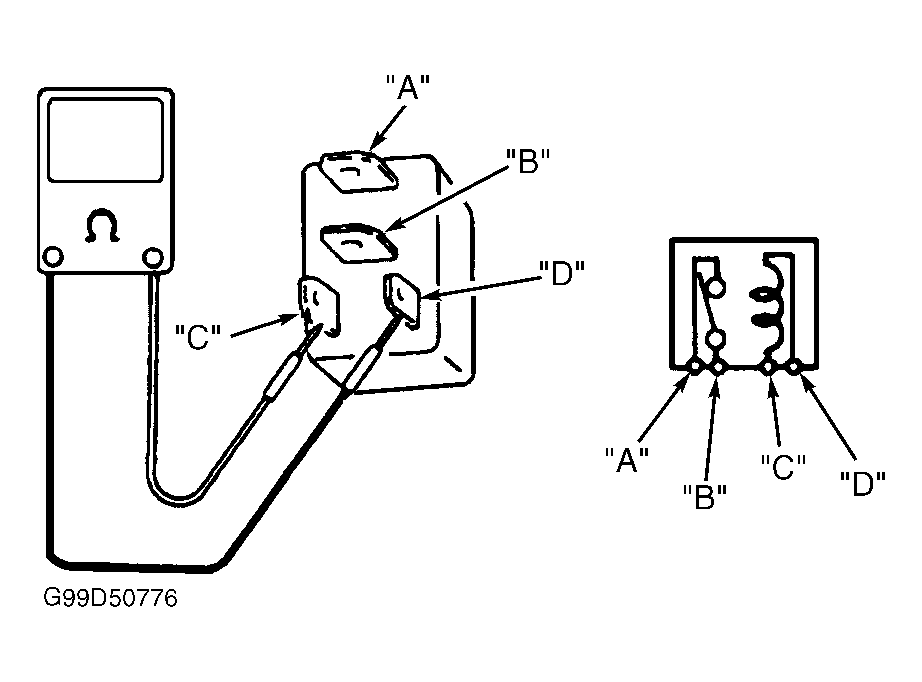
- Working with main relay. Measure resistance of main relay between terminals "C" and "D". See Fig 2. Resistance should be 79-95 ohms at 68°F (20°C). Also, check continuity of main relay between terminals "A" and "B". Continuity should not exist. If resistance is as specified, go to next step. If resistance is not as specified, replace main relay. After repair, retest system.
- Apply battery voltage between terminals "C" and "D". Continuity should now exist between terminals "A" and "B". If continuity or resistance is not as specified, replace relay. After repair, retest system. If continuity and resistance are as specified, install main relay and go to next step.
- Turn ignition off. Disconnect ECM 26-pin harness connector C51-3 and ECM 35-pin harness connector E61. ECM is located under instrument panel, behind glove box. See Figure. Check for poor terminal contact at ECM harness connectors. If problem is found, repair as necessary. After repair, retest system. If terminal contact is okay, go to next step.
- Turn ignition on. Measure voltage between ground and ECM harness connector C51-3 terminal No. 20 (Black/White wire). See Figure. Also, measure voltage between ground and ECM harness connector E61 terminal No. 9 (Blue wire). If voltage reading is 10-14 volts, go to step 8. If voltage reading is not 10-14 volts, go to next step.
- Check for open in Black/White wire between ECM harness connector C51-3 and IG fuse (20-amp). See WIRING DIAGRAMS
article. Also, check for open in Blue wire between ECM and main relay or Black/Red wire between main relay and MAIN RELAY fuse (15-amp). If problem is found, repair as necessary. After repair, retest system.
- Connect a fused jumper wire between ground and ECM harness connector E61 terminal No. 9 (Blue wire). See Figure. Turn ignition on. Measure voltage between ground and ECM harness connector C51-3 terminal No. 15 (Blue/Black wire). If voltage reading is 10-14 volts, go to step 10. If voltage reading is not 10-14 volts, go to next step.
- If main relay operating sound was heard in step 1, go to step 11. If operating sound was not heard in step 1, check for open in Black/Red wire between MAIN RELAY fuse (15-amp) and main relay. Also, check for open in Blue wire between main relay and ECM connector E61 terminal No. 9. If problem is found, repair as necessary. After repair, retest system.
- Check for open in Black/Orange wires between ground and ECM harness connector C51-2 terminal No. 7 or ECM harness connector C51-3 terminal No. 17. See WIRING DIAGRAMS
article. Also, check for open in Black/Green wire between ground and ECM harness connector C51-3 terminal No. 6. If problem is found, repair as necessary. After repair, retest system. If no problem with wiring is found, substitute a known good ECM, and retest system.
- Check main relay, as tested in step 3. If relay tests as specified, go to next step. If relay does not test as specified, replace relay. After repair, retest system.
- Check for open in Black/Red wire between MAIN RELAY fuse (15-amp) and main relay. See WIRING DIAGRAMS
article. Also, check for open in Blue/Black wire between main relay and ECM. If problem is found, repair as necessary. After repair, retest system.
 Courtesy of SUZUKI OF AMERICA CORP.
 Courtesy of SUZUKI OF AMERICA CORP.