Diagnosis & Repair Procedure
- If engine system check has been performed, go to next step. If engine system check has not been performed, go to A4: ENGINE SYSTEM CHECK under SYSTEM TESTS.
- Test drive vehicle and check speedometer operation. If speedometer does not function properly and indicate actual vehicle speed, go to step 5. If speedometer functions properly and indicates actual vehicle speed, go to next step.
- Turn ignition off. Disconnect VSS 3-pin harness connector. VSS is located in transmission extension case (2WD models) or transfer case (4WD models). Disconnect ECM 28-pin harness connector C51-1. ECM is located under instrument panel, behind glove box. See Figure. Check for open in Blue/Yellow wire between VSS and ECM. See WIRING DIAGRAMS
article. If problem is found, repair as necessary. After repair, repeat DTC CONFIRMATION TEST . If no problem is found, go to next step.
- Check for poor terminal contact at ECM harness connector C51-1. If problem is found, repair as necessary. After repair, repeat DTC CONFIRMATION TEST . If terminal contact is okay, problem is probably intermittent. See INTERMITTENTS
in TROUBLE SHOOTING - NO CODES article. If intermittent problem is not found, substitute a known good ECM and repeat DTC CONFIRMATION TEST .
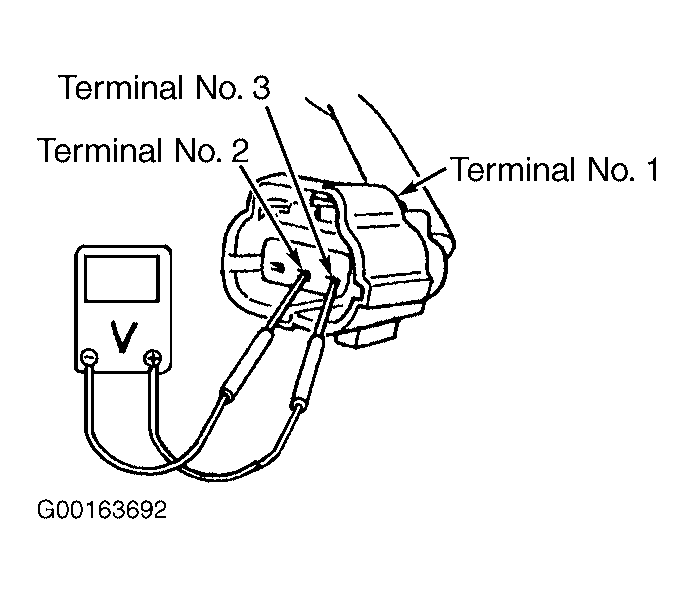
- Turn ignition off. Disconnect VSS 3-pin harness connector. VSS is located in transmission extension case (2WD models) or transfer case (4WD models). Turn ignition on. Measure voltage between VSS harness connector terminals No. 2 (Black/Yellow wire) and No. 3 (Blue/Black wire). See Fig 1. If reading is 10-14 volts, leave ignition on and harness connector disconnected and go to step 7. If reading is not 10-14 volts, go to next step.
- Check for open or short in Blue/Black wire between VSS and main relay. See WIRING DIAGRAMS
article. Also, check for open or short in Black/Yellow wire between ground and VSS. If problem is found, repair as necessary. After repair, repeat DTC CONFIRMATION TEST .
- Measure voltage between VSS harness connector terminals No. 1 (Blue/Yellow wire) and No. 2 (Black/Yellow wire). If voltage reading is 4 volts or more, go to next step. If voltage reading is less than 4 volts, go to step 9.
- Remove VSS from transfer case (4WD models) or extension case of transmission (2WD models). Check VSS drive and driven gears for damage or excessive wear. If problem is found, replace VSS. After repair, repeat DTC CONFIRMATION TEST . If no problem with VSS is found, substitute a known good VSS and repeat DTC CONFIRMATION TEST .
- Remove instrument panel. See appropriate INSTRUMENT PANELS article in ACCESSORIES & EQUIPMENT. Disconnect instrument cluster 16-pin harness connector G11. Measure voltage between VSS harness connector terminals No. 1 (Blue/Yellow wire) and No. 2 (Black/Yellow wire). See Fig 1. If voltage reading is 4 volts or more, substitute a known good instrument cluster and repeat DTC CONFIRMATION TEST . If voltage reading is less than 4 volts, go to next step.
- If vehicle is not equipped with cruise control, go to next step. If vehicle is equipped with cruise control, turn ignition off. Disconnect cruise control module 12-pin harness connector. Cruise control module is located on fender wheel. Turn ignition on. Measure voltage between VSS harness connector terminals No. 1 (Blue/Yellow wire) and No. 2 (Black/Yellow wire). See Fig 1. If voltage reading is 4 volts or more, substitute a known good cruise control module and repeat DTC CONFIRMATION TEST . If voltage reading is less than 4 volts, go to next step.
- Check for open or short in Blue/Yellow wire between VSS, ECM, speedometer and cruise control module (if equipped). See WIRING DIAGRAMS
article. If problem is found, repair as necessary. After repair, repeat DTC CONFIRMATION TEST . If no problem with wiring is found, go to next step.
- Substitute a known good ECM, and repeat DTC CONFIRMATION TEST . If DTC does not reset, testing is complete.
 Courtesy of SUZUKI OF AMERICA CORP.