Diagnosis & Repair Procedure
- If engine system check has been performed, go to next step. If engine system check has not been performed, go to A4: ENGINE SYSTEM CHECK
under SYSTEM TESTS.
- Using scan tool, check for DTCs. See RETRIEVING DIAGNOSTIC TROUBLE CODES
under SELF-DIAGNOSTIC SYSTEM. If DTC P0463 is set, perform testing procedure for P0463 first. See DTC P0463: FUEL LEVEL SENSOR CIRCUIT - HIGH VOLTAGE INPUT
. If DTC P0463 is not set, go to next step.
- If SUZUKI scan tool is not available, go to next step. If SUZUKI scan tool is available, turn ignition off and connect scan tool. Turn ignition on and note fuel level displayed on scan tool. Add one gallon (3.7 L) of fuel to tank and recheck fuel level displayed on scan tool. If fuel level increased by about 7 percent, problem is probably intermittent. See INTERMITTENTS
in TROUBLE SHOOTING - NO CODES article. If displayed fuel level does not increase by about 7 percent, go to step 5
.
- Turn ignition on. Backprobing at ECM, measure voltage between ground and ECM 22-pin connector E92 terminal No. 11 (Pink/Blue wire). See Figure
. Record reading. Turn ignition off. Add one gallon (3.7 L) of fuel to tank. Turn ignition on. Recheck voltage reading. Voltage should drop. If voltage is lower, problem is probably intermittent. See INTERMITTENTS
in TROUBLE SHOOTING - NO CODES article. If voltage is not lower, go to next step.
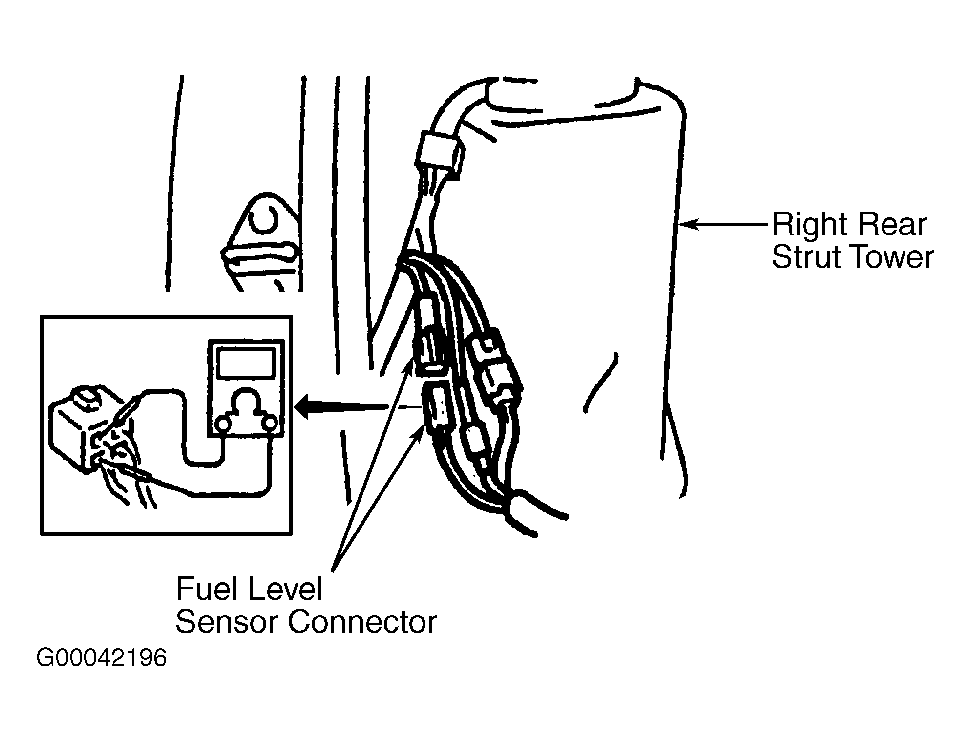
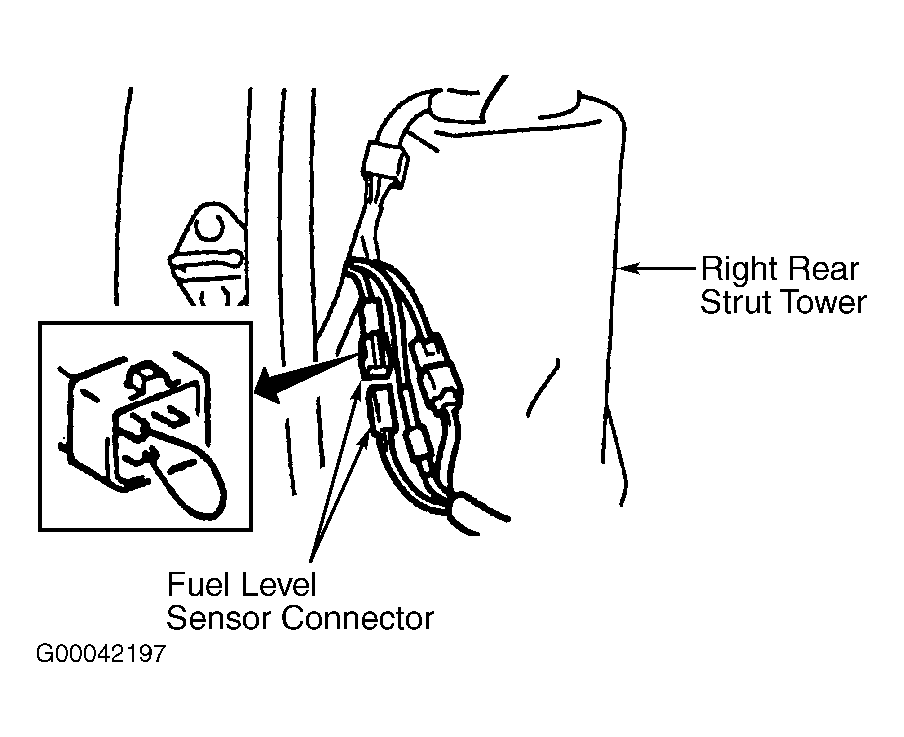
- Turn ignition off. Disconnect fuel level sensor 4-pin in-line harness connector L36/R01. In-line harness connector L36/R01 is located on right rear strut tower, under trim panel. See Fig 1
. Check for poor terminal contact at fuel level sensor in-line harness connector. If poor terminal contact is found, repair as necessary and retest system. If no problem is found, leave harness connector disconnected and go to next step.
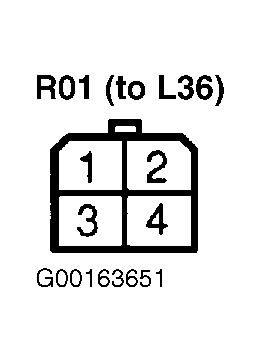
- Measure resistance between component side of fuel level sensor in-line harness connector terminals No. 4 (Pink/Blue wire) and No. 2 (Black wire). See Fig 2
and Fig 3
. Observe resistance change as one gallon (3.7 L) of fuel is added to fuel tank. Resistance should drop about 3-120 ohms. If resistance does not decrease as specified, go to next step. If resistance decreases as specified, go to step 8
.
- Check for short or open in Pink/Blue wire between fuel level sensor, fuel gauge and ECM. See WIRING DIAGRAMS
article. If problem is found, repair as necessary. If no problem is found, replace fuel level sensor. After repair, retest system.
- Turn ignition off. Disconnect ECM 22-pin harness connector E92. ECM is located under instrument panel, behind glove box. See Figure
. Check for poor terminal connection in ECM harness connector E92. If problem is found, repair as necessary and retest system. If no problem is found, go to next step.
- Turn ignition on. When fuel level sensor harness connector is disconnected fuel gauge should read empty. Using a fused jumper wire connect fuel level sensor in-line harness connector L36 terminals No. 4 (Pink/Blue wire) and No. 2 (Black wire), side towards fuel gauge. See Fig 2
and Fig 3
. Fuel gauge should read full. If fuel gauge reads as specified, substitute a known good ECM, and retest system. If fuel gauge does not read as specified, go to next step.
- Check for short or open in Pink/Blue wire between fuel level sensor, fuel gauge and ECM. See WIRING DIAGRAMS
article. Also check for open in Black wire between ground and fuel level sensor. If problem is found, repair as necessary. If no problem is found, replace fuel level sensor. After repair, retest system.
 Courtesy of SUZUKI OF AMERICA CORP.
 Courtesy of SUZUKI OF AMERICA CORP.
 Courtesy of SUZUKI OF AMERICA CORP.