Front Seat Lumbar Support Replacement
WARNING: This page is about a different car, the 2007 Suzuki XL7. However, it is still accessible from the selected car via links, so may be relevant.
 Courtesy of SUZUKI OF AMERICA CORP.
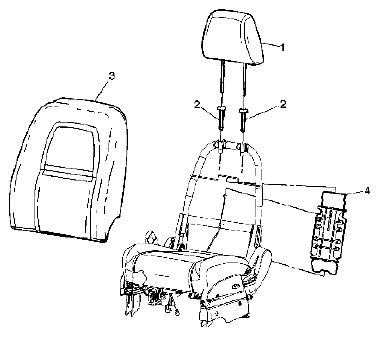
 FRONT SEAT LUMBAR SUPPORT COMPONENTS REFERENCE
| Callout |
Component Name |
Preliminary Procedure
Remove the front seat. Refer to FRONT SEAT REPLACEMENT - BUCKET . |
| 1 |
Front Seat Head Restraint
Refer to FRONT SEAT HEAD RESTRAINT REPLACEMENT . |
| 2 |
Front Seat Head Restraint Guides
Procedure
- Disconnect the lower J-hook retainer from the seat back trim cover.
- Carefully pull up the trim cover, disengaging the hook and loop retainers until the head restraint guides are exposed.
- Squeeze the locking tabs on the head restraint guide and pull the guides up and out of the seat back pad.
|
| 3 |
Seat Back Cushion Cover and Pad
Refer to FRONT SEAT BACK CUSHION COVER AND CUSHION PAD REPLACEMENT (NON FOLD FLAT) and FRONT SEAT BACK CUSHION COVER AND CUSHION PAD REPLACEMENT (FOLD FLAT) . |
| 4 |
Front Seat Back Lumbar
- Adjust the lumbar knob until the lumbar is at the position of the least support.
- Remove the lumbar cable end from the lumbar unit by compressing the unit while lifting out the barrel end of the cable assembly at the actuator.
- Using a flat-bladed tool, twist out the upper portion of the lumbar unit from the seat frame cross wire.
- Using a flat-bladed tool, twist out the lower portion of the lumbar unit from the seat frame cross wire.
|