Auxiliary Air Conditioning Evaporator Tube Replacement
WARNING: This page is about a different car, the 2007 Suzuki XL7. However, it is still accessible from the selected car via links, so may be relevant.
 Courtesy of SUZUKI OF AMERICA CORP.
 CALLOUT COMPONENT NAME TABLE
| Callout |
Component Name |
Preliminary Procedure
- Recover the refrigerant. Refer to REFRIGERANT RECOVERY AND RECHARGING .
- Raise and suitably support the vehicle. Refer to LIFTING AND JACKING THE VEHICLE
.
- Remove left rear tire and wheel. Refer to REMOVAL PROCEDURE
.
- Remove left rear inner wheel house liner. Refer to REAR WHEELHOUSE LINER PANEL REPLACEMENT
.
- Remove rubber exhaust hangers to gain access to A/C and heater pipes (Qty: 3).
- Remove auxiliary evaporator tubes from HVAC module. Refer to HVAC HOSE/LINE REPLACEMENT
Tightening torque
4 N.m (35 lb in)
- Remove auxiliary evaporator tubes from front evaporator pipes. Refer to HVAC HOSE/LINE REPLACEMENT - FRONT
.
- Remove auxiliary evaporator tubes from front underside of vehicle. Refer to HVAC HOSE/LINE REPLACEMENT - UNDERBODY
.
Tightening torque
4 N.m (35 lb in)
|
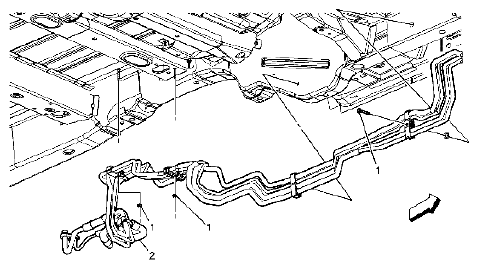
| 1 |
Auxiliary Evaporator Tube Attaching Nuts (Qty: 3)
Tightening torque
4 N.m (35 lb in) |
| 2 |
Auxiliary Evaporator Tubes
Tip:
Reposition auxiliary evaporator tubes accordingly to remove. |