Inspection/Repair/Vehicle Marking Procedures
INSPECTION/REPAIR/VEHICLE MARKING PROCEDURESApplies to any vehicle within the below VIN ranges that are visiting your dealership or which are in your dealership stock.
A Verify that the vehicle is within the specified VIN ranges.
Model - Samurai all Models
VIN ranges: 1986 MP Convertible JS3JC51C0G4100007 - JS3JC51C3G4128965
1986 TR Convertible JS4JC51C8G4100042 - JS4JC5106G4128969
1986 MP Van JS3JC51V9G4100010 - JS33C51V8G4111063
1986 TR Van JS4JC51V2G4100054 - JS4JC51V7G4111065
1987 MP Convertible JS3JC51CXH4130004 - JS3JC51C8H4185079
1987 TR Convertible JS4JC51CXH4130001 - JS4JC51C1H4185081
1987 MP Van JS3JC51V6H4115002 - JS3JC51V2H4133450
1987 TR Van JS4JC51VXH4115001 - JS4JC51V9H4133456
^ If no - STOP.
^ If yes - Proceed to next step.
B Verify that the campaign was not
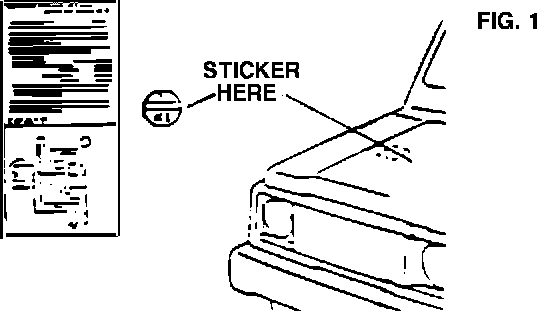
previously completed. Check for Sticker K2 under the hood next to the emission control system label (FIG. 1).
^ If yes - STOP.
^ If no - Proceed to next step.
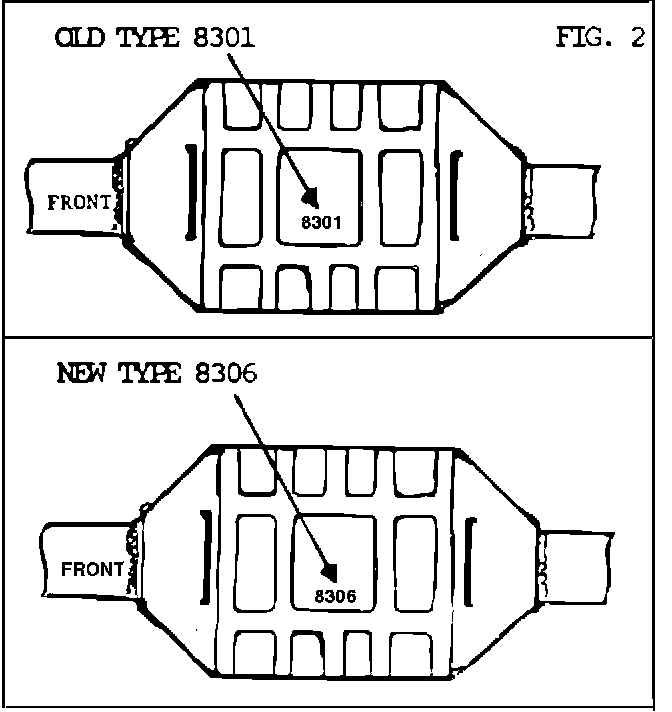
C Verify the type of converter on the
vehicle.
^ If NEW TAX - apply sticker K2 (FIG. 2) and report variation JA.
^ If OLD TAX - proceed to next step.
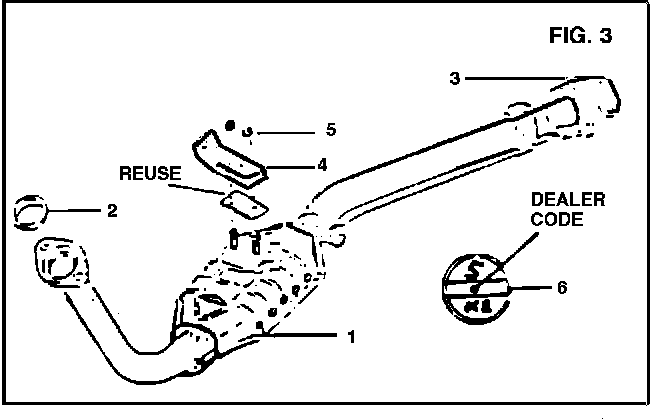
D Install kit & apply sticker:
Campaign kit # 14150-83840 consists of:
1 Converter # 14150-83840* 1
2 Sealing Ring # 14183-82601 1
3 Gasket # 14699-83000 1
4 Bracket # 14284-83020 1
5 Nut # 08316-16083 2
6 Sticker # 99963-01501-037 1
* Not available separately through regular parts channels under this part #.
INSTALLATION INSTRUCTIONS
^ WARNING: To avoid danger of being burned, do not touch the exhaust sytem when the system is hot. Any service on the exhaust system should be performed when the system is cool.
^ WARNING: When lifting the vehicle, use a frame contact hoist and follow safety in the shop manual.
^ Remove the converter's two (2) front spring loaded bolts at the front flange. Alternate several turns on each bolt to reduce the possibility of thread damage. Penetrating oil on the exposed bolt thread may assist removal.
^ While supporting the converter:
1. Remove the two (2) bolts and nuts at the rear flange.
2. Remove the front and rear hanger mounting bolts.
3. Remove the converter.
^ Remove the bracket and insulator from the old converter. Install the old insulator on the new converter together with the new bracket and nuts supplied with the kit.
^ While supporting the converter:
1. Install the front and rear hanger mounting bolts.
2. Install the two (2) bolts, nuts, and gasket at the rear flange.
3. Install the two (2) front mounting bolts, springs and sealing rings. To prevent thread damage alternately turn each bolt until tight. Verify correct alignment and sealing condition.
^ Tightening Torques:
Flange bolts (front) 40-60 N-m
29.0-43.0 ft.lb.
Flange bolts (rear) 18-28 N-m
13.5-20.0 ft.lb.
Hanger bolts (front & rear) 18 N-m
13.0 ft.lb.
Bracket nuts 18-28 N-m
13.5-20 ft.lb.
^ Mark vehicle:
Put your dealer code on the marking sticker with a non-erasable ink pen and apply the marking sticker under the hood (FIG.1). Make sure the surface is clean to assure proper adhesion.
^ Dispose of old converter by recycling (See Bulletin Item 7).