September 30: LEMON manuals is back up on a temporary server! Slowness is possible
No. 3 Engine Mount Removal Note
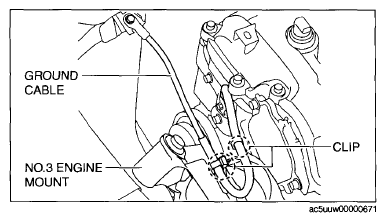
- Remove the clips shown in the figure and set the ground cable aside.
 Courtesy of MAZDA MOTORS CORP.
- Remove the front under cover No. 2. (See FRONT UNDER COVER No. 2 REMOVAL/INSTALLATION
.)
CAUTION:
- To prevent deformation of the oil pan, support the engine using the following methods.
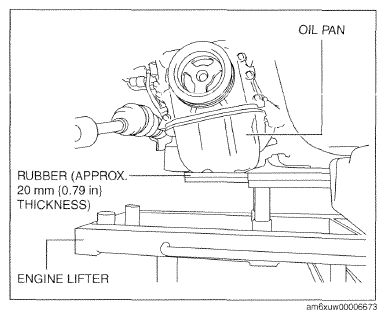
- When using an engine lifter, insert rubber of appropriate size (approx. 20 mm {0.79 in} thickness) between the engine lifter and the oil pan to support the oil pan.
- When using a garage jack, place rubber of appropriate size (approx. 20 mm {0.79 in} thickness) on a batten which is large enough to cover the oil pan to support the oil pan.
- Before removing the No. 3 engine mount, support the engine (oil pan) using a commercially available engine lifter or garage jack.
 Courtesy of MAZDA MOTORS CORP.
CAUTION:
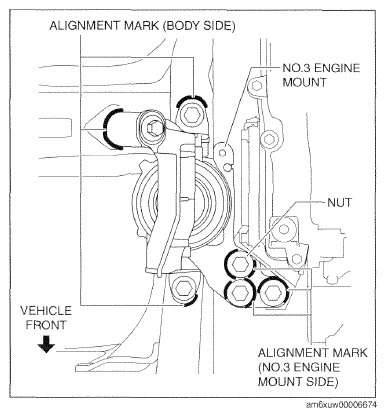
- Slots have been adopted for the No. 3 engine mount installation holes. If the No. 3 engine mount is deviated from the original position when installing the No. 3 engine mount, engine noise or vibration could increase. Before removing the No. 3 engine mount, place alignment marks on the No. 3 engine mount and body so that they can be assembled to the same positions as before removal.
- Place alignment marks on the locations shown in the figure so that they can be assembled to the same positions as before removal.
 Courtesy of MAZDA MOTORS CORP.
NOTE:
- Paint so that the No. 3 engine mount is framed on the body side and the outline of the nut is framed on the No. 3 engine mount side.
- Remove the No. 3 engine mount.