Charging System Indicator Test
Charging System Indicator Test1. Turn the ignition switch ON (II).
Does the charging system indicator come on?
YES - Go to step 2.
NO - Go to step 3.
2. Start the engine.
Does the charging system indicator go off?
YES - Charging system indicator circuit is OK.
NO - Go to step 3.
3. Turn the ignition switch OFF.
4. Troubleshoot the multiplex control system.
Is the multiplex control system OK?
YES - Go to step 5.
NO - Check the multiplex control system as indicated by the diagnostic trouble code (DTC).
5. Disconnect the engine wire harness 8P connector from the starter sub-harness 8P connector.
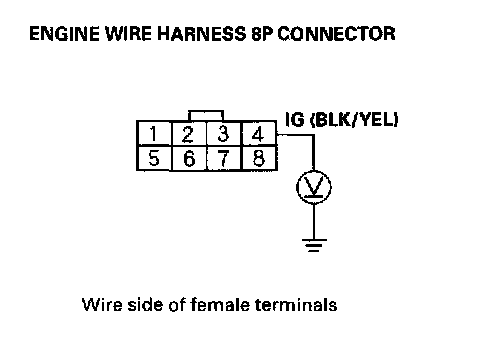
6. Measure the voltage at the No. 4 terminal of the engine wire harness 8P connector with the ignition switch ON (II).
Is there battery voltage?
YES - Go to step 7.
NO - Check for a blown No.4 (10A) fuse in the under-dash fuse/relay box. If the fuse is OK, repair open in the wire between the alternator and the under-dash fuse/relay box.
7. Turn the ignition switch OFF.
8. Disconnect the negative cable from the battery.
9. Disconnect engine control module (ECM)/ powertrain control module (PCM) connector B (24P).
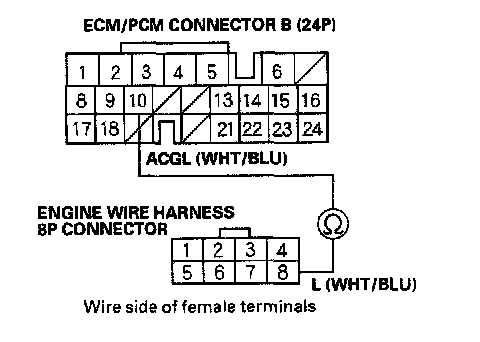
10. Check continuity between the ECM/PCM connector terminal B10 and engine wire harness 8P connector terminal No.8.
Is there continuity?
YES - Go to step 11.
NO - Repair open in the wire between the alternator and the ECM/PCM.
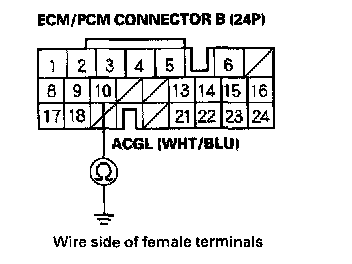
11. Check continuity between the ECM/PCM connector terminal B10 and body ground.
Is there continuity?
YES - Repair short in the wire between the alternator and the ECM/PCM.
NO - Reconnect the negative cable to the battery, and go to alternator and regulator test.