September 30: LEMON manuals is back up on a temporary server! Slowness is possible
DTC P0340: No Cam Signal At Pcm: Testing
- Turn ignition on. Using scan tool, read CURRENT CMP COUNT while cranking engine. If CURRENT CMP COUNT changes while cranking engine, go to next step. If CURRENT CMP COUNT does not change while cranking engine, go to step 13
.
- Turn ignition off. Disconnect CMP sensor harness connector. See Fig 1
. Inspect connectors for damage or poor connections. Repair connectors as necessary. If connectors are okay, turn ignition on. Measure voltage between ground and 8-volt supply circuit (Orange wire) at CMP sensor harness connector. If voltage is more than 7.5 volts, go to next step. If voltage is 7.5 volts or less, go to step 9
.
- Turn ignition off. Measure resistance between ground and sensor ground circuit (Black/Light Blue wire) at CMP sensor harness connector. If resistance is less than 5 ohms, go to next step. If resistance is 5 ohms or more, check for open in Black/Light Blue wire between CMP sensor and PCM. Repair circuit as necessary. If circuit is okay, replace PCM.
- Turn ignition on. Measure voltage between ground and signal circuit (Tan/Yellow wire) at CMP sensor harness connector. If voltage is less than 4.5 volts, go to next step. If voltage is 4.5-5.5 volts, replace CMP sensor. If voltage is more than 5.5 volts, repair short to voltage in Tan/Yellow wire between CMP sensor and PCM.
- Turn ignition off. Disconnect PCM harness connectors. See Figure
. Inspect connectors for damage or poor connections. Repair connectors as necessary. If connectors are okay, measure resistance between ground and signal circuit (Tan/Yellow wire) at CMP sensor harness connector. If resistance is 5 ohms or more, go to next step. If resistance is less than 5 ohms, repair short to ground in signal circuit.
- Measure resistance of signal circuit (Tan/Yellow wire) between CMP sensor harness connector and terminal No. 33 at PCM C1 harness connector. See Figure
. If resistance is less than 5 ohms, go to next step. If resistance is 5 ohms or more, repair open in signal circuit.
- Measure resistance between signal circuit (Tan/Yellow wire) and sensor ground circuit (Black/Light Blue wire) at CMP sensor harness connector. If resistance is 5 ohms or more, go to next step. If resistance is less than 5 ohms, repair short between signal circuit and sensor ground circuit.
- If no other possible causes are remaining, replace PCM.
- Turn ignition off. Disconnect PCM harness connectors. See Figure
. Inspect connectors for damage or poor connections. Repair connectors as necessary. If connectors are okay, measure resistance of 8-volt supply circuit (Orange wire) between CMP sensor harness connector and terminal No. 44 at PCM C2 harness connector. See Figure
. If resistance is less than 5 ohms, go to next step. If resistance is 5 ohms or more, repair open in 8-volt supply circuit.
- Measure resistance between ground and 8-volt supply circuit (Orange wire) at CMP sensor harness connector. If resistance is 5 ohms or more, go to next step. If resistance is less than 5 ohms, repair short to ground in 8-volt supply circuit.
- Measure resistance between 8-volt supply circuit (Orange wire) and signal circuit (Tan/Yellow wire) at CMP sensor harness connector. If resistance is 5 ohms or more, go to next step. If resistance is less than 5 ohms, repair short between 8-volt supply circuit and signal circuit.
- If no other possible causes are remaining, replace PCM.
- Turn ignition off. Using lab scope, backprobe CMP sensor signal circuit (Tan/Yellow wire) at PCM C1 connector terminal No. 33. See Figure
and Figure
. Start engine. Observe lab scope screen while wiggling related wiring harness and connectors. If any irregularities in lab scope pattern are present, carefully inspect related wiring harness connectors. Repair connectors as necessary. If connectors are okay, replace CMP sensor. If no irregularities in lab scope pattern are present, go to next step.
- Turn ignition off. Visually inspect related wiring harness. Check for chafed, pierced, pinched or partially broken wires. Visually inspect related wiring harness connectors. Check for broken, bent, pushed out or corroded terminals. Refer to any Technical Service Bulletins (TSBs) that may apply. If a problem is found, repair as necessary. If no problems are found, go to next step.
- Turn ignition off. Using lab scope, backprobe CKP sensor signal circuit (Gray/Black wire) at PCM C1 connector terminal No. 32. While observing lab scope screen, turn ignition on. If CKP sensor generated any pulses, replace CKP sensor. If CKP sensor did not generate any pulses, test is complete.
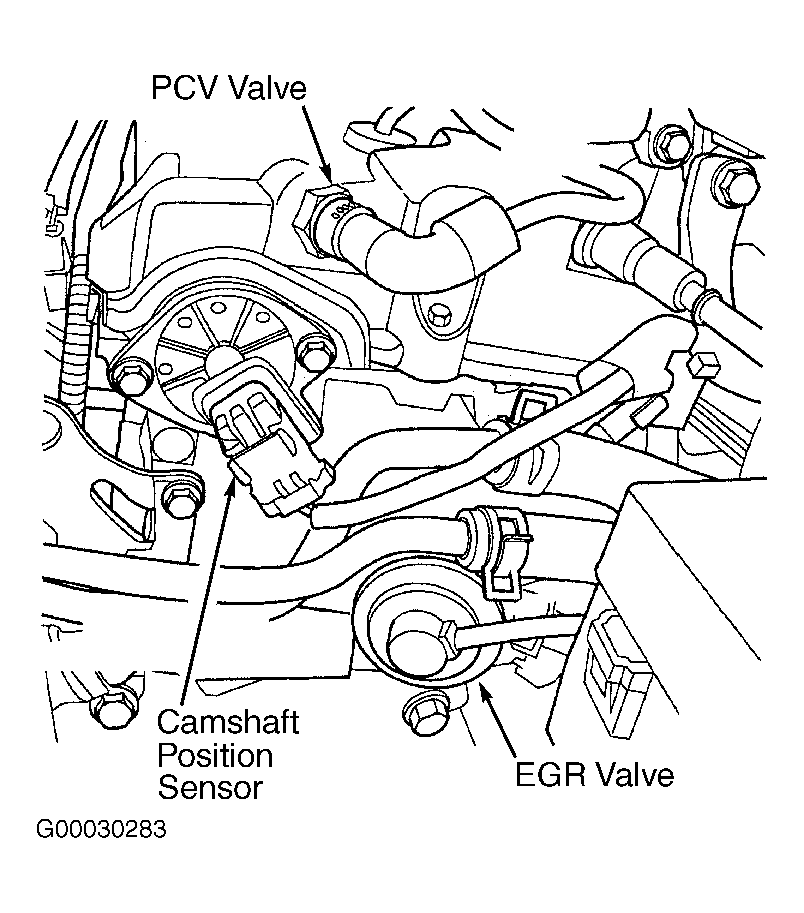 Courtesy of DAIMLERCHRYSLER CORPORATION