September 30: LEMON manuals is back up on a temporary server! Slowness is possible
Fuel Pressure Regulator Replacement
- Relieve the fuel pressure (see
FUEL PRESSURE RELIEVING ).
- Remove the charge air cooler (see
CHARGE AIR COOLER REMOVAL AND INSTALLATION
).
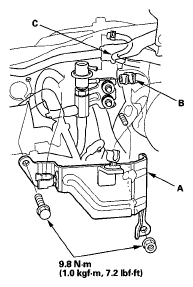
- Remove the pressure regulator cover (A).
 Courtesy of AMERICAN HONDA MOTOR CO., INC.
- Disconnect the fuel return hose (B), and vacuum hose (C).
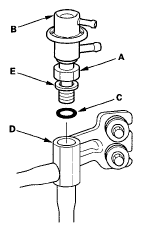
- Loosen the nut (A), then remove the fuel pressure regulator (B).
 Courtesy of AMERICAN HONDA MOTOR CO., INC.
- Coat the new O-ring (C) with clean engine oil, and install the fuel pressure regulator into the fuel pressure regulator base (D) by hand until the washer (E) is pressed between the base and the regulator.
NOTE:
Do not fully tighten the fuel pressure regulator yet.
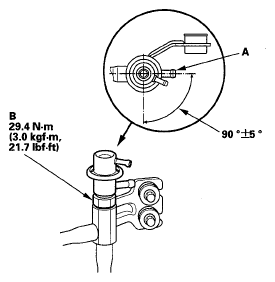
- Make sure the fuel return pipe (A) is positioned as shown. If needed, turn the fuel pressure regulator counterclockwise to line up the pipe.
NOTE:
- Do not turn the fuel pressure regulator clockwise.
- Do not turn the fuel pressure regulator counterclockwise more than once complete turn.
 Courtesy of AMERICAN HONDA MOTOR CO., INC.
- Tighten the nut (B) to the specified torque.
- Connect the fuel return hose and vacuum hose.
- Turn the ignition switch ON (II), but do not operate the starter. After fuel pump runs for about 2 seconds, the fuel rail is pressurized. Repeat this two or three times, then check for leaks.
- Install the pressure regulator cover, then install the charge air cooler (see
INSTALLATION
).